Have you ever sent a file over to your print provider thinking it was complete, ready to print, only to find that it was really not “ready to print”? If this has happened to you, don’t worry, you are certainly not alone, especially if your full time job is not that of a graphic design professional. If you are not quite sure what, exactly, your printer needs to go along with your original design file or how to go about putting it all together for them this is the “how to” for you. Here are Diana’s tips on pre-flighting and packaging your InDesign file for print:
1. Open your design file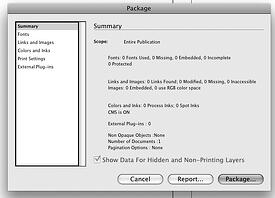
2. In the menu go to the File tab and scroll down
3. Select Package and open
4. A Summary page will open.
Check the summary for:
a. Fonts: The number of fonts used will be indicated, 1, 2, 3 etc. Each additional item should have a 0 next to it. If not, go to the left window and open fonts. This will show you each font and if there is a problem with it.
b. Links and Images: The number of links used will be indicated, 1, 2, 3 etc. Each additional item should have a 0 next to it. If not, go to the left window and open Links and Images. This will show you where there are errors.
c. Colors and Inks: If this is a process color job only process inks should be indicated here. If this is a spot (PMS) color job only spot inks should be indicated. Next, for spot color, go to the left window and select colors and inks. Make sure that you have the correct PMS color selected. Make sure you have selected your PMS color as uncoated or coated, not both. If both options are chosen your PMS colors will be interpreted as two different colors and will not match when printed.
Note: RGB should not appear selected for process or spot colors
5. Once your file has been pre-flighted and corrected select Package in the bottom right corner.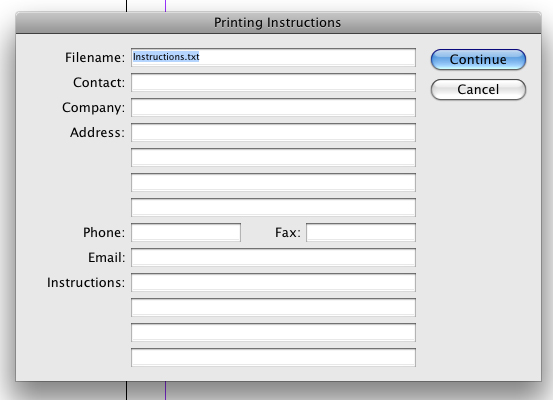
6. Printing Instructions will be the next window that you see. This should be filled out with your contact information and any specific instructions that you may have for your printer. Once complete, select Continue in the upper right corner.
 *click on graphics to enlarge view
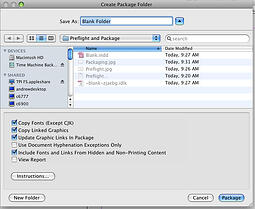
7. Create Package Folder
Save as: Give your folder a name
Make sure the following items are checked:
Copy Fonts
Copy Inked Graphics
Update Graphic Links in Package
Include font & links from hidden & non-printing content
8. Select Package in the bottom right corner
9. Hurray, you're done!
Now, all needed fonts, links, instructions and the InDesign file will be placed in the new folder and your job is ready to send to your print provider.
Has this TPI Solutions Ink “how to” been helpful? What tips do you have to offer? Do you have a question that you would like answered in our next “how to” blog? Comments and questions are greatly appreciated.
Download a copy of this how to guide:

